Continuous Integration with CML and Github Actions
What is CML?
CML, which stands by Continuous Machine Learning, it's an open-source library focused on delivering CI/CD for machine learning projects. Its principles includes: GitFlow: Using Git workflow for managing experiments alongside DVC versioning data and models. Auto reports for experiments: CML can generate reports in pull requests with metrics and plots helping the team to make informed and data-driven decisions Technology Agnostics: Build pipelines with Github or Gitlab and run experiments with any cloud service. Since we are using Github as our Git repository, Github Actions will be used to set up CML. Github Actions is managed by Github, so there is no need to worry about scale and operate the infrastructure just as other tools like Jenkins.
Testing With Github Actions
First, we will make sure our tests created at the Testing with Pytest and Black section are being executed every time that there is a new push to the repository on Github. This important in order to achieve redundancy in testing the project, and avoid making sure the code runs without errors on any environment and not just the developer's computer.
To do this is very simple. If you used cookiecutter you should already have a file named test_on_push.yaml at .github/workflows/ folder. The content of the file should be:
name: Python Package and Test

    on: [push]

    jobs:
        build:

        runs-on: ubuntu-latest
        strategy:
        matrix:
            python-version: [3.6]

        steps:
        - uses: actions/checkout@v2
        - name: Set up Python ${{ matrix.python-version }}
        uses: actions/setup-python@v2
        with:
        python-version: ${{ matrix.python-version }}
        - name: Install dependencies
        run: |
        python -m pip install --upgrade pip
        pip install pytest black
        if [ -f requirements.txt ]; then pip install -r requirements.txt; fi
        - name: Test with pytest
        run: |
        pytest
        - name: Python Black
        run: |
        black . --check
Now, we should take a look into those commands.
Choosing when this action will run
on: [push]
Setting up a Github Instance to run it
runs-on: ubuntu-latest
Chosing the right version of Python
matrix:
    python-version: [3.6]
Installing test requirements
python -m pip install --upgrade pip
pip install pytest black
Installing project requirements
if [ -f requirements.txt ]; then pip install -r requirements.txt; fi
Running Pytest
- name: Test with pytest
    run: |
    pytest
Running Black check
- name: Python Black
     run: |
     black . --check
If all tests pass the commit pushed to the repository will receive a green check show it has no errors.

Pipeline Test
After setting up our test on push, let's focus on reproducing our pipeline on push and generate an automated report in pull requests to compare the experiment with the model at the main branch.
Configuring Credentials
To reproduce our experiment pipeline, we need to start pulling our data versioned by DVC. On the other hand, Github Actions will execute our pipeline inside a container pre-configured by CML that doesn't have our IBM credentials to pull the data from IBM COS. So, to solve this, let's configure our IBM credentials in Github Secrets.
Github Secrets is a repository tool that encrypts credentials to be used as environment variables in the project.
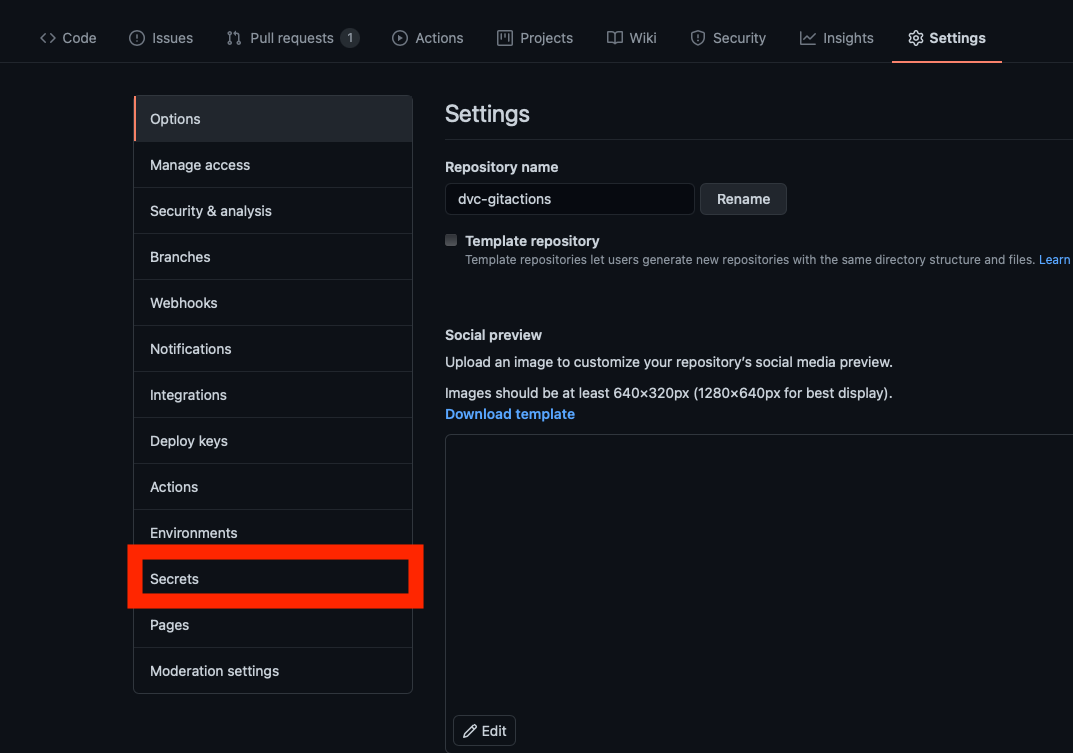
- Go to the repository settings

- On the left menu, click on 'Secrets'

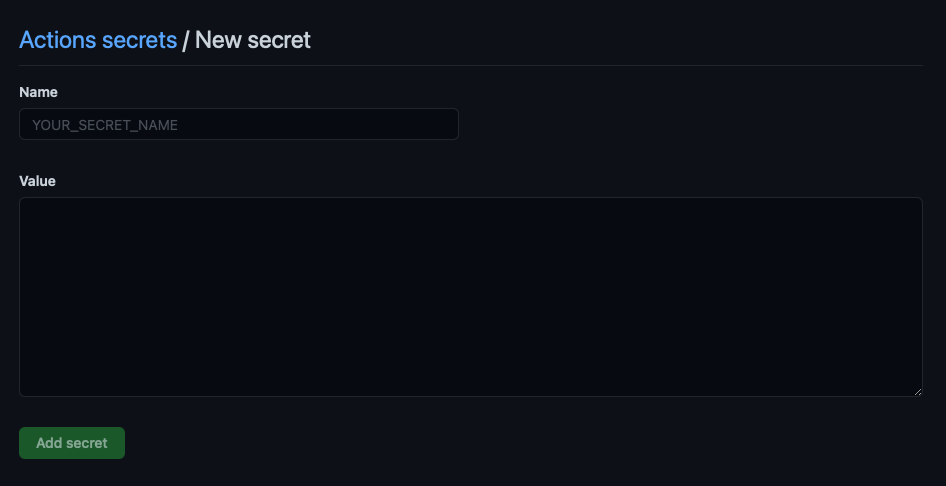
- Click on 'New repository secret'

- Add both
AWS_ACCESS_KEY_IDandAWS_SECRET_ACCESS_KEY

Adding Train and Evaluate Workflow
Just like we did at the Testing Setup, let's create a file named train_evaluate.yaml at the .github/workflows/ folder, which content should be:
name: model-training-evaluate
    on: [push]
    jobs:
     run:
     runs-on: [ubuntu-latest]
     container: docker://dvcorg/cml-py3:latest
     steps:
     - uses: actions/checkout@v2
     - name: 'Train and Evaluate model'
     shell: bash
     env:
     repo_token: ${{ secrets.GITHUB_TOKEN }}
     AWS_ACCESS_KEY_ID: ${{ secrets.AWS_ACCESS_KEY_ID }}
     AWS_SECRET_ACCESS_KEY: ${{ secrets.AWS_SECRET_ACCESS_KEY }}
     run: |
     # Install requirements
     pip install -r requirements.txt

     # Pull data & run-cache from IBM COS and reproduce pipeline
     dvc pull --run-cache
     dvc repro

     # Report metrics
     echo "## Metrics" >> report.md
     git fetch --prune
     dvc metrics diff master --show-md >> report.md

     # Publish ROC Curve and
     echo -e "## Plots\n### ROC Curve" >> report.md
     cml-publish ./results/roc_curve.png --md >> report.md
     echo -e "\n### Precision and Recall Curve" >> report.md
     cml-publish ./results/precision_recall_curve.png --md >> report.md
     cml-send-comment report.md
Let's dig into each command:
Setting up a CML pre-configured container
container: docker://dvcorg/cml-py3:latest
Setting up environment credentials for IBM COS
env: repo_token: ${{ secrets.GITHUB_TOKEN }}
AWS_ACCESS_KEY_ID: ${{ secrets.AWS_ACCESS_KEY_ID }}
AWS_SECRET_ACCESS_KEY: ${{ secrets.AWS_SECRET_ACCESS_KEY}}
Installing requirements
pip install -r requirements.txt
Pull the versioned data and reproduce the full pipeline of training and evaluation
dvc pull --run-cache
dvc repro
Formatting report section tittles
echo "## Metrics" >> report.md
echo -e "## Plots\n### ROC Curve" >> report.md
echo -e "\n### Precision and Recall Curve" >> report.md
Comparing metrics and publishing it to the report
dvc metrics diff master --show-md >> report.md
Publishing figures from the experiment to the report
cml-publish ./results/roc_curve.png --md >> report.md
cml-publish ./results/precision_recall_curve.png --md >> report.md
Return the final report formatted as a comment on the Commit or Pull Request
cml-send-comment report.md
The Report should look like the following:
(.zoom)