Deployment with Watson Machine Learning
What is Watson Machine Learning?
Watson Machine Learning (WML) is a service from the IBM Cloud suite that supports popular frameworks such as TensorFlow, PyTorch, and Keras to build and deploy models. Using this tool we can store, version and deploy models via online deployment.
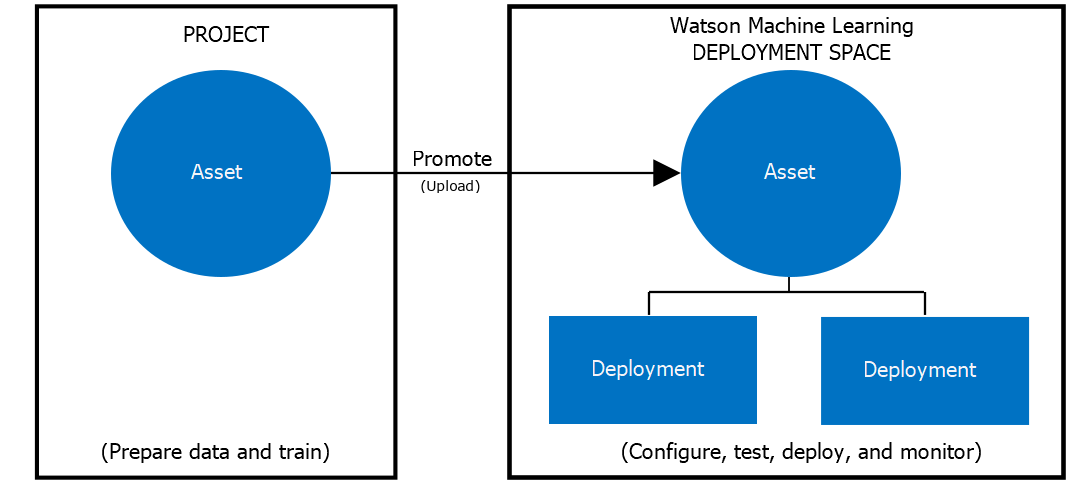
After creating and training a ML model we can upload it as an Asset in the Deployment Space, in the IBM Cloudpak. When we create a new deployment, we choose what model asset we want the deployment to reference:
 IBM Dataplatform Deocumentation
Deployment using Python API
To deploy our ML model, we will use IBM's Watson Machine Learning, which will allow us to easily deploy the model as a web service. Since we want to automatize pipelines, we will be creating scripts using the WML Python API.
Note
The complete script can be found on our example repository
The deployment scrip takes the path to the trained model, the path to the root of the project containing the metadata.yaml file, and the credentials file.
python3 model_deploy_pipeline.py ./model_file ../path/to/project/ ../credentials.yaml
-
Using these arguments constant variables are set import os import sys import yaml
MODEL_PATH = os.path.abspath(sys.argv[1]) PROJ_PATH = os.path.abspath(sys.argv[2]) CRED_PATH = os.path.abspath(sys.argv[3]) META_PATH = PROJ_PATH + "/metadata.yaml" -
After that, the
yamlfiles are loaded as dictionaries and the model is loaded (using eitherjobliborpickle).with open(CRED_PATH) as stream: try: credentials = yaml.safe_load(stream) except yaml.YAMLError as exc: print(exc) with open(META_PATH) as stream: try: metadata = yaml.safe_load(stream) except yaml.YAMLError as exc: print(exc) with open(MODEL_PATH, "rb") as file: # pickle_model = pickle.load(file) pipeline = joblib.load(file) -
The next step is to create an instance of the IBM Watson
client, to do that the credential loaded above will be used and a default Deployment Space will be set using the ID contained in the credentials file, other constants will be set with information’s regarding the model found on themetadatafile.from ibm_watson_machine_learning import APIClient wml_credentials = {"url": credentials["url"], "apikey": credentials["apikey"]} client = APIClient(wml_credentials) client.spaces.list() MODEL_NAME = metadata["project_name"] + "_" + metadata["project_version"] DEPLOY_NAME = MODEL_NAME + "-Deployment" MODEL = pipeline SPACE_ID = credentials["space_id"] client.set.default_space(SPACE_ID) -
Before the deployment, we need to give Watson some characteristics from our model, such as name, type (in this case is
scikit-learn_0.23) and specifications of the instance that will run the micro-service. Next, the model is stored as anAsseton Watson ML.model_props = { client.repository.ModelMetaNames.NAME: MODEL_NAME, client.repository.ModelMetaNames.TYPE: metadata["model_type"], client.repository.ModelMetaNames.SOFTWARE_SPEC_UID: client.software_specifications.get_id_by_name( "default_py3.7" ), } model_details = client.repository.store_model(model=MODEL, meta_props=model_props) model_uid = client.repository.get_model_uid(model_details) -
Once completed, we'll give the deployment a name and then deploy the model using the store ID obtained in the previous step.
deployment_props = { client.deployments.ConfigurationMetaNames.NAME: DEPLOY_NAME, client.deployments.ConfigurationMetaNames.ONLINE: {}, } deployment = client.deployments.create( artifact_uid=model_uid, meta_props=deployment_props ) -
Finally, the storage and deployment IDs are added or updated to in the
metadata.yamlfile.deployment_uid = client.deployments.get_uid(deployment) metadata["model_uid"] = model_uid metadata["deployment_uid"] = deployment_uid f = open(META_PATH, "w+") yaml.dump(metadata, f, allow_unicode=True)
Accessing Model Predictions
Having deployed the model, we can access it's predictions by sending requests to an end-point or by using the Python ibm_watson_machine_learning library, where we can send either features for a single prediction or payloads containing multiple lines of a dataframe, for example.
The payload body is made of the dataframe column names under the "fields" key and the features under "values" .
payload = {
    "input_data": [
        {
            "fields": X.columns.to_numpy().tolist(),
            "values": X.to_numpy().tolist(),
        }
    ]
}

result = client.deployments.score(DEPLOYMENT_UID, payload)
import requests

url = "https://us-south.ml.cloud.ibm.com/ml/v4/deployments?space_id=<string>&tag.value=<string>&asset_id=<string>&version=2020-09-01"

payload = {
    "input_data": [
        {
            "fields": X.columns.to_numpy().tolist(),
            "values": X.to_numpy().tolist(),
        }
    ]
}

headers= {}

response = requests.request("GET", url, headers=headers, data = payload)

print(response.text.encode('utf8'))
The model response will contain the scoring result containing prediction and corresponding probability. In the case of a binary classifier, the response will have the following format:
[1, [0.06057910314628456, 0.9394208968537154]],
[1, [0.23434887273340754, 0.7656511272665925]],
[1, [0.08054183674380211, 0.9194581632561979]],
[1, [0.07877206037184215, 0.9212279396281579]],
[0, [0.5719774367794239, 0.42802256322057614]],
[1, [0.017282880299552716, 0.9827171197004473]],
[1, [0.01714869904990468, 0.9828513009500953]],
[1, [0.23952044576217457, 0.7604795542378254]],
[1, [0.03055527110545664, 0.9694447288945434]],
[1, [0.2879899631347379, 0.7120100368652621]],
[0, [0.9639766912352016, 0.03602330876479841]],
[1, [0.049694416576558154, 0.9503055834234418]],
Warning
This consumes CUH. Watson Machine Learning CUH are used for running experiments, so there is a limit on how many times you can make requests to the model on a Free Tier.
Updating the Model
Updating the asset containing the model and/or updating the deployment.
Note
The complete scripts for the deployment and model can be found on our template repository.
-
Firstly we need to update the model asset in WML by passing the new model as well as a name.
print("\nCreating new version") published_model = client.repository.update_model( model_uid=MODEL_GUID, update_model=model, updated_meta_props={ client.repository.ModelMetaNames.NAME: metadata["project_name"] + "_" + metadata["project_version"] }, ) -
After that a new revision can be created.
new_model_revision = client.repository.create_model_revision(MODEL_GUID) rev_id = new_model_revision["metadata"].get("rev") print("\nVersion:", rev_id) client.repository.list_models_revisions(MODEL_GUID) -
Finally we can update the deployment.
change_meta = {client.deployments.ConfigurationMetaNames.ASSET: {"id": MODEL_GUID}}

print("Updating the following model: ")
print(client.deployments.get_details(DEPLOYMENT_UID))

client.deployments.update(DEPLOYMENT_UID, change_meta)
Model Rollback
We have previously created revisions of a model, to rollback the model version, we'll list all the revisions made.
Note
-
Listing the revisions.
client.repository.list_models_revisions(MODEL_GUID)Output:
-- ------------- ------------------------ ID NAME CREATED 3 Rain_aus_v0.3 2021-03-31T18:28:07.771Z 2 Rain_aus_v0.3 2021-03-31T18:28:07.771Z 1 Rain_aus_v0.3 2021-03-31T18:28:07.771Z -- ------------- ------------------------ -
Now we can choose which revision we want to rollback to and then update the deployment referencing that revision ID.
MODEL_VERSION = input("MODEL VERSION: ") meta = { client.deployments.ConfigurationMetaNames.ASSET: { "id": MODEL_GUID, "rev": MODEL_VERSION, } } updated_deployment = client.deployments.update( deployment_uid=DEPLOYMENT_UID, changes=meta ) -
Finally, we'll wait for the update to finish so we can see if it was successful.
status = None
while status not in ["ready", "failed"]:
    print(".", end=" ")
    time.sleep(2)
    deployment_details = client.deployments.get_details(DEPLOYMENT_UID)
    status = deployment_details["entity"]["status"].get("state")

print("\nDeployment update finished with status: ", status)